
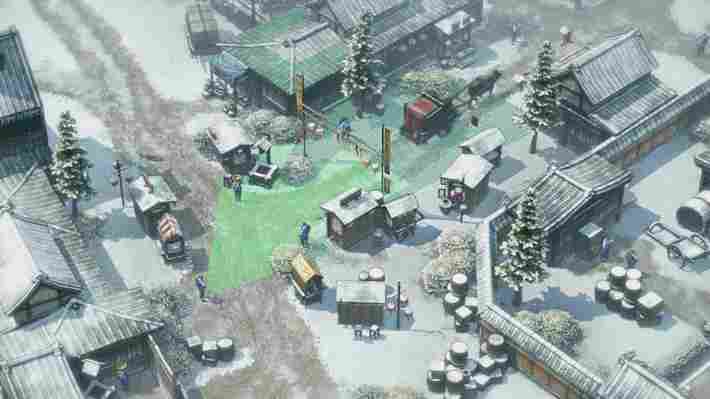
Shadow Tactics: Blades of the Shogun is a bold real-time tactics game by Daedalic Entertainment and Mimimi Production that is heavily focused on stealth and a strategic understanding of the game’s various characters. Constantly compared to Commandos (1998) and Desperados (2001), we think this 2016 release is an excellent step for the genre to take into more modern gaming.
The story features five characters in their role during a plot to depose their Shogun:
This is a title that puts a tremendous focus on how the characters use their unique skills in tandem to inch their way closer to their goal. “This is a puzzle!” Yuki will exclaim. Right you are, Yuki.

Every character has a specialization, and since every mission has a different combination of playable characters it can be daunting having to learn the ins and outs of each one. We’ve put together a character guide to help analyze and explain the unique angle that each character can provide for those troubling viewcones and circuitous patrols.
Hayato
Hayato is Shadow Tactics’ introductory character for a reason – he’s both the most versatile and the easiest to pick up. “Move like water,” he will say, and it’s what he does: Fast and agile, Hayato can get around the battlefield quickly, and can get virtually anywhere through jumping, climbing, and rappelling.
Hayato can also use his blade to eliminate targets very quickly, and can carry bodies rather than dragging them, making him a good pick for body disposal. If you’re unsure which character is best suited for a particular enemy setup, try starting your strategy with Hayato .
If you’re fast enough – and Hayato is – an instant will be all that you need to re-position or score a quick kill. Note that guards distracted by the rock will not move from their location. Rather, they will simply turn, re-orienting their viewcones until the distraction period ends. This can be to your benefit if you just want people to look the other way and don’t necessarily want them to move from their spot.
Note, however, that while the shuriken instantly kills the target, their death animation is quite long and anyone who spots the dying guard will expose you, putting the place on high alert. A good way to prevent this is to walk over and pick up the target before they fall, which will cut the animation short.
One great tactic with Hayato’s shuriken is to use it to quickly dispatch patrols of two. Throw the shuriken at one of the guards, and before the other can react, run up and swiftly dispatch him with the sword.
Mugen
Mugen is your team’s Samurai – an absolute tank in terms of health, power … and also speed. Boasting three times the health bar of any other playable character, if there’s someone that needs to get hurt, always pick Mugen.
Slow but powerful, Mugen is able to kill enemies just as quickly as Hayato, heave huge boulders onto enemies, and can carry two bodies at once – even while running. Mugen also will not care if that body is a regular guard or a heavy armored Samurai – he’s able to carry them all the same, which is nuts . Mugen’s Samurai armor does prevent him from swimming or climbing anything short of ladders, though.
Furthermore, Mugen is the only character in the game capable of killing Samurai in melee combat , making him your prime choice for dispatching them should the need arise. And it will. Often.
This only works on regular guards and civilians, however, and will not affect Samurai or straw hat guards. If the guard picks up the bottle, you will have to kill or KO him in order to retrieve it for reuse. The sake bottle is a great way to lure targets into an ambush or out of another NPC’s viewcone where you can kill them undetected.
While the cooldown for this ability is lengthy, it’s not as long as you might think considering how powerful this is. Don’t hesitate to use it as needed. This is especially useful in tandem with lure abilities that bring enemies to a set location, as Mugen can emerge from a bush or from behind a wall and eliminate all targets at once.
Yuki
The thief, Yuki’s specialty is the bait and lure . Able to keep pace with Hayato, Yuki can also reach any point on the map, making her ideal for scouting and positioning. Yuki’s not quite as strong as Hayato, and not nearly as strong as Mugen, so her ability to carry bodies is limited to dragging them – much slower.
Instead of a sword, Yuki also uses a dagger, the “stick and stab” of which has a longer animation than Mugen or Hayato’s default kills. Use this with caution if there’s a chance that you’ll be spotted.
Yuki’s lure has the advantage of being able to attract any number of opponents within earshot, so it pairs very well with Mugen’s sword wind or Takuma’s bombs. Don’t underestimate the usefulness of this tool even late in the game. A couple seconds of a Samurai looking in a different direction can open a window for you.
In this regard, Yuki, too, is capable of killing two targets at once – one with her knife and another with the trap. The trap can also be used without the help of a lure; it just has to be placed on a guard’s patrol path, so keep track of who’s moving and when no one will witness them die.
Aiko
Aiko is the resident disguise expert and a kunoichi to boot, meaning she can match the speed and agility of Hayato and Yuki. As such, she too can rappel, climb, and swim as the need arises. Aiko is at her most useful, though, when she has access to a disguise .
Uniquely, Aiko can roam the ranks of any guards as long as they are not Samurai. Samurai will be able to see through her disguise, removing it and setting the place on alert. Like Yuki, Aiko is not strong enough to carry bodies, and will instead have to drag them. Her hairpin is her blade of choice, and grants “a quick and elegant death.”
The best times to use this tool are when a guard’s viewcone passes over a spot where you need to be, or if you need to quickly eliminate someone just on the edge of a guard’s viewcone. By the time their vision returns, you’ll have been in and out and the enemy in question dealt with and dragged away.
Aiko can also approach a guard and talk with them, forcing them to look at her for the duration of the conversation (which can go on indefinitely; she’s good at her job). When engaging in conversation with a guard, be sure you position Aiko in beforehand in such a way that the guard will be turning AWAY from where you don’t want them looking when they face Aiko.
Takuma
Takuma is arguably the trickiest character to use in Shadow Tactics as he’s the only one with a “capped” number of kills he can get per mission. He’s also limited in terms of mobility due to his leg injury which renders him unable to rappel, climb, swim, or even to carry bodies. Plus, any time Takuma walks he makes a loud noise with his peg leg, meaning you’ll only be walking with him after an area’s been completely cleared and there’s no chance of the noise accidentally alerting someone.
At first glance, Takuma seems the weakest character of the bunch, but trust us – this is a very balanced game. For every disadvantage Takuma suffers, he’s in every regard a specialist when it comes to what he does best and has the most tools at his disposal. The best way to use Takuma is as an ace in the hole . Have him target and eliminate whoever has the broadest, most irksome viewcone, then have your ninjas take care of the rest. You just need to pick that initial target carefully.
While your number of bullets is limited, there are several factors to keep in mind:
1. You might find more ammo
First off, most maps with Takuma have one or two ammo boxes at certain locations, typically in or near lookout towers. Getting to these points is a good way to plan your strategy, and will give Takuma the most options for targets.
2. He carries a spare bullet
Takuma will also ALWAYS save a bullet for mission objectives, so if your mission involves shooting, say, an explosive crate, you need not worry about hoarding your ammo in order to complete it.
3. He can shoot highlighted targets like ropes
Finally, Takuma’s accuracy is so uncanny that he can even snap a rope from one hundred yards away with his rifle. If that rope is holding something heavy, whoever gets sadly crushed beneath it will die – and it will be deemeed a “terrible workplace accident.”
Apart from using this to keep guards distracted, it’s also a very effective way to clump several NPCs together. They can then be dispatched by either Takuma’s bombs or Mugen’s sword wind. Don’t worry – Kuma will not be harmed by either.
In our experience, if you even consider spending a bomb, it’s usually worth using. Even if you only take out a few enemies with it, it will make your life much easier. If it’s a choice between using Takuma’s bomb or Mugen’s sword wind, however, do go with the sword wind; you can use that indefinitely. These bombs will also work on Samurai!
Shared items
On missions where Mugen or Takuma are not present this is your best bet for killing Samurai. Try to shoot and kill with the same person and you’ll likely suffer return fire. Mugen’s pistol is stronger than the others’ and can kill a Samurai in a single shot.
More from Softonic
7 best Minecraft mods
The 8 best addons for World of Warcraft
5 ways gaming can make you an awesome musician
How to play thousands of retro arcade games for free on your PC
