While the upgrade to Windows 10 should be smooth sailing, as with any new operating system you will have to tweak it to get it working just the way you like it
Windows 10 doesn’t allow for any radical customization yet, though that may change with future updates. Let’s see what you can do right away.
1. Disable or minimize ‘UAC’
UAC stands for User Account Control , and is one of Windows’ security systems. When you install a program that is trying to make system changes, it’s UAC pops up asking you if you’re sure.

User Account Control is not a bad thing, and you should keep it enabled. However, if you like to make changes to Windows 10 regularly, you probably don’t need bugging about it every time.
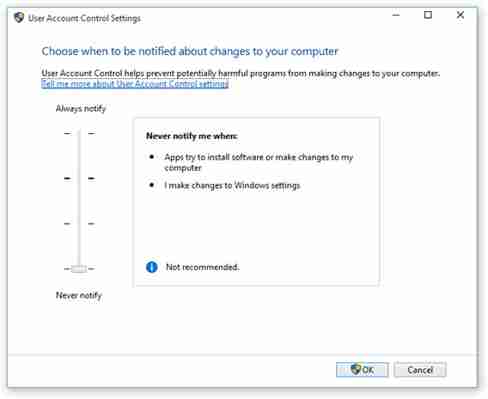
You can change how much UAC will ask for verification, luckily. Open the Control Panel, then User Accounts, and User Accounts Control Settings. Here you’ll find four levels of UAC:
– Always notify .
This means you’ll be notified every time a program wants to make changes to your computer or you change Windows settings that require Administrator rights. When these notifications appear, your desktop will be dimmed and you’ll have to deal with it before continuing with other tasks. It’s the most secure, but also most intrusive setting
– Notify me only when programs try to make changes to my computer
This will still notify you when programs want to make changes to your computer, but not if you personally make changes to Windows settings that require Administrator rights.
– Notify me only when programs try to make changes to my computer (do not dim my desktop)
The same as 2, but your desktop will not be dimmed. This means you can continue working with other apps when UAC asks for your attention.
– Never notify
This means you’ll never get UAC notifications. When you are logged in with an account that has Administrator rights, programs will be able to make changes to your computer without your knowledge. Therefore, you have to be careful what programs you run and install, as they will have the same rights and access as an Admin account.
2.Activate Cortana with a button
The default setting in Windows 10 for Cortana includes her search bar on the Taskbar, which takes up quite a bit of space.

You can remove this by right clicking the Taskbar, and going to Search – Hidden. But you can keep Cortana on the Taskbar by right clicking, and choosing Find – Show Search Icon. This will leave a neat circular search button on the Taskbar, from where you can activate Cortana.
You can also set Cortana to wake with a voice command, ‘Hey Cortana’. This can be enabled in Cortana’s settings.
3. Use Classic Shell
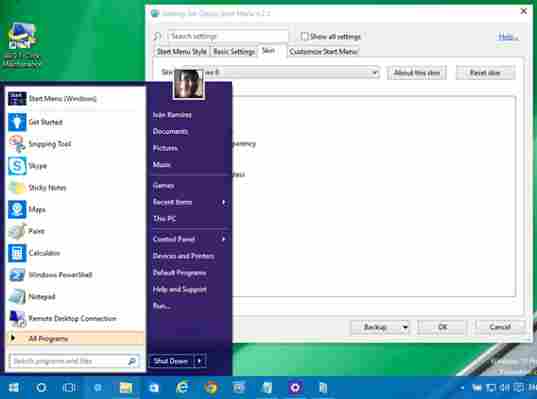
We’ve heard it a lot – the Start Menu is back in Windows 10. But it’s still not the one we pine for from Windows 7 and earlier. Classic Shell is an old program that for years has supplied excellent, high quality alternative Start Menus.

This Start Menu is very personalizable – you can make it look like Windows 8, 7, or even XP. The Classic Shell Start Menu is full of options. You can choose different skins, buttons, and menus… a wonder for customization fans.
4. Use the Start Menu without Tiles
If you prefer not to install an extra program like Classic Shell, but you have little interest in the new style Modern UI apps, you can rid your Start Menu of these turbulent tiles.
Unfortunately, you cannot do this all at once. To remove tiles from the Start Menu, right click on each one and choose ‘disable live tile’. It takes a while, but once you’re finished you can resize the Start Menu to hide the empty space.
5. Change which sections appear in the Start Menu
While the Windows 10 Start Menu has relatively few options, it does at least let you choose what appears in it. Find this in Options – Personalize – Home.
In the main window you can choose between your most used apps, newly installed apps, and recent documents. You can also click Choose Which Folders Appear on Start, which gives you a load more options for what you can see on the Start Menu.
6. Sign in Automatically
The login screen for Windows 10 may be very attractive, but if you’re the only person who uses a PC, it’s a little unnecessary.
You can disable it with a little app called Winaero Tweaker , which gives you some additional startup options. Install the app, and go to Boot and Login – Disable Lock Screen. You can also do this with AVG TuneUp. With this app, look in Optimization – Modify Windows Settings – Security – Administration – Login. You’ll need to enter your password to deactivate the login screen.
7. Use an image as your password
If you want to keep your PC secure, and maintain the login screen, there are still more ways you can alter it. Open Settings – Accounts – Login Options.
Here, you can choose different types of password. You can use a four (or more) digit numerical PIN, for example. More entertainingly, you can use an image. To do this, you’ll have to upload an image, and the ‘password’ will consist of clicks and swipes over it.
You could use your own face, for example, and set the password as clicks on your eyes and nose.
8. Customize File Explorer
Every time you open a new folder in Windows Explorer, it will open Quick Access by default. This is the equivalent of Favorites in Windows 7. It’s not a bad option, but if you don’t use Quick Access and prefer instead to use the old ‘This PC’, you can.
Open an Explorer window, and choose Options from the Tools tab. In Folder options you can then set File Explorer to open in Quick Access or This PC mode.
9. Make changes to the Command Prompt
The what? Command Prompt is really only for the fabled advanced users, and moreover, the ones who wish to type their commands in MS-DOS. Windows 10 adds some more options for Command Prompt, including changing the opacity of its window.
To change this, right click on Command Prompt’s top bar and open Properties – Experimental. Here you’ll see a bar to change the opacity.
The Command Prompt now supports common shortcuts like Ctrl + C and so on, just like every other application, which makes it much easier to use.
10. Change the language
If for some reason Windows 10 is not in the language you want, just like in older versions you can change the system language, and it’s easy to do.
All you have to do is open Settings, then Time & Language. Choose the one you want, or if it’s not there, click Add a Language. Once added, clicking any language in your list lets you set it as default.
Remember, you can find all of our Windows 10 coverage here .

